AVI
My website code stuff
Project maintained by Locust0 Hosted on GitHub Pages — Theme by mattgraham
BFS, A*, and Wall Creation
June 5, 2019
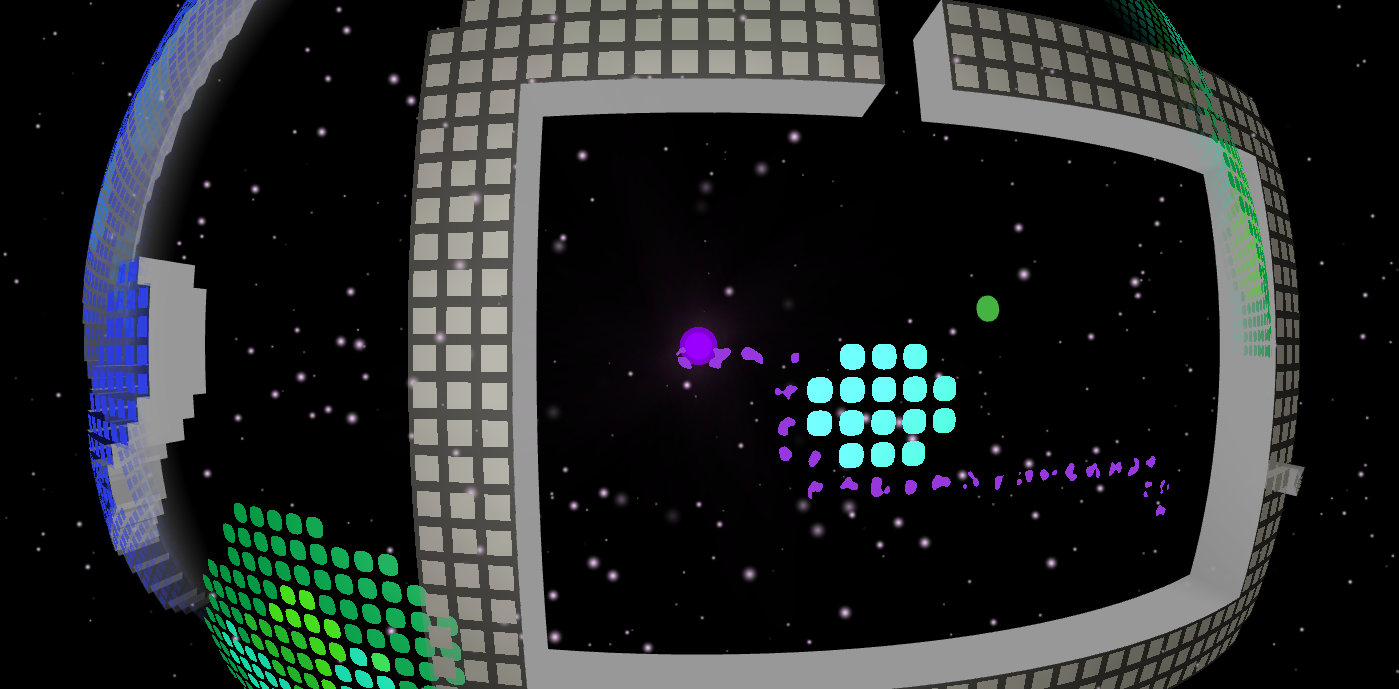
Above are a few algorithms that I recently implemented from scratch in my weird looping world. To deal with the fact that the world loops I developed two custom classes to handle all the looping for me.
- WrappingPixel: Named with the w_ prefix, it denotes a position in the level in terms of a pixel position. You can call the up, down, left, and right methods to get pixels in those directions which will loop appropriately.
- Offset: Named with the o_ prefix, it denotes a position in the level in terms of a vector with 0, 0 being the bottom left of the level. X increases to the right by 1 for each pixel. position 0, 0 is the bottom left corner of the pixel 0. Offset features the Add method which return a properly wrapped offset and the Subtract method which returns a Vector resulting from subtracting two offsets (wrapped appropriately)
Wrapping Pixels can be transformed into Offsets which can be transformed into actual positions in the world and positions can be transformed into Offsets and then into Wrapping Pixels.
My world is divided into 3 layers:
- Solid: which is completely impassable and never changes
- Destructible: which is completely impassable but can be destroyed
- Magic: which displays magical walls created by the player
With all that said, I can now discuss the algorithms which work in this world.
BFS
The easiest of the algorithms I’ll be discussing, this function returns a list of Wrapping Pixels in range of a BFS given a collision mask and a range.
public List<WrappingPixel> BFS (WrappingPixel w_Start, int range, CollisionMask collisionMask)
{
    // List of pixels we've seen and should avoid rechecking
    List<int> visited = new List<int>();
    // List of pixels we are considering
    List<WrappingPixel> w_Fringe = new List<WrappingPixel>();
    // List of pixels approved to be returned
    List<WrappingPixel> w_Returned = new List<WrappingPixel>();

    fringe.Add(w_Start);

    for (int i = 0; i < range; i++)
    {
        // The fringe to consider for the next iteration
        List<WrappingPixel> w_TempFringe = new List<WrappingPixel>();

        for (int j = 0; j < w_Fringe.Count; j++)
        {
            WrappingPixel w_Temp = w_Fringe[j];

            // If this pixel is valid and not visited
            if (!visited.Contains(w_Temp.pixel) && CanEnter(w_Temp.pixel, collisionMask))
            {
                w_Returned.Add(w_Temp);

                // Add the nearby pixels
                w_TempFringe.Add(w_Temp.up());
                w_TempFringe.Add(w_Temp.down());
                w_TempFringe.Add(w_Temp.left());
                w_TempFringe.Add(w_Temp.right());

                // Add this to the visited array
                visited.Add(w_Temp.pixel);
            }
        }
        // After looping through every pixel in this range, set the fringe to all potential candidates
        w_Fringe = w_TempFringe;
    }
    // Return every valid pixel we found
    return w_Returned;
}
If you’ve never seen a BFS, what this does is look at all pixels near w_Start in range of range. It avoids passing through anything which it’s told to avoid in the collisionMask. It returns a diamond shaped segment of the world around the start unless a wall is blocking expansion in that direction.
A note about this algorithm, is that it will add pixels to the fringe regardless of whether they’ve already been added. The fix for this is to include the check in the if statement before every tempFringe.Add statement. This makes the code significantly more repetitive while not actually reducing the number of checks performed for each step. Either way each of those pixels needed to be checked.
This is used for finding the pixels affected by a bomb’s explosion or the player’s magic.
A*
Next up is everyone’s favorite pathfinding algorithm. It’s fast and optimal so I of course needed it for my game’s enemies. I won’t include all the code for the actual algorithm because it’s identical to every other implementation. The unique modifications to it which were needed to make it work in my game are below.
// This is how I handle wrapping. I use the wrapping pixel class to manage it for me
List<WrappingPixel> w_Neighbors = new List<WrappingPixel>();

if (CanEnter(w_Current.up().pixel, collisionMask))
    w_Neighbors.Add(w_Current.up());
if (CanEnter(w_Current.right().pixel, collisionMask))
    w_Neighbors.Add(w_Current.right());
if (CanEnter(w_Current.down().pixel, collisionMask))
    w_Neighbors.Add(w_Current.down());
if (CanEnter(w_Current.left().pixel, collisionMask))
    w_Neighbors.Add(w_Current.left());

// This is the heuristic I use for calculating the pixels to explore first
// It's the Euclidian distance between two pixels in terms of their offsets
private float heuristic(WrappingPixel w_Start, WrappingPixel w_Goal)
{
    return w_Start.Offset().DistTo(w_Goal.Offset());
}
Here I made the game print the path it found from the player’s position to the origin of the world using A*.

Then I made an enemy follow the path it found using A*. The way the enemy currently works is that it paths to the next waypoint whenever it reaches a waypoint. In this gif, I blocked its desired location (bottom left) when it reached its waypoint in the top right. This caused it to path downwards to avoid the magic before moving across.

Wall Creation
This is the hard part of what I’ve been doing recently. In the above gif you’ll notice that the solid layer is physically elevated and there is a grey wall which props it up. All of this was done with the help of the following tutorial.

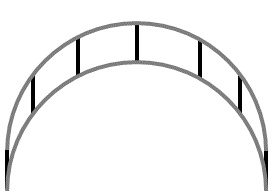
This approach generates vertical walls. This works for small walls when viewed from the player’s perspective which is always the top of the sphere. However, it isn’t technically accurate.
When the time came to try and implement line of sight visualizations for the enemies (so the player can avoid them) the inaccurate walls above couldn’t be used to cast shadows.
Every enemy now has what they can see shown with a light casted from above them onto an invisible sphere level with them. With this method, all I need are proper walls jutting out over every layer to force the light to cast shadows over what isn’t visible.

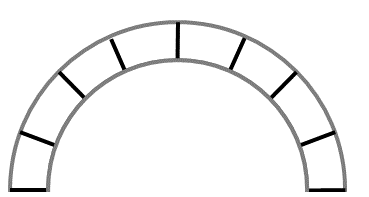
But how do I make the walls normal to the surface of the sphere like I have above? With a lot of math in my vertex shader. I’ll explain everything in 2D to make it a bit easier.

Let’s go through exactly what had to be done to transform my walls to be normal to the surface of the circle. First, it’s important to remember that a line is being bent into a circle by this math. The center is not being affected and as you travel to the edges, the vertexes are pushed down by up to the radius to create a circle.
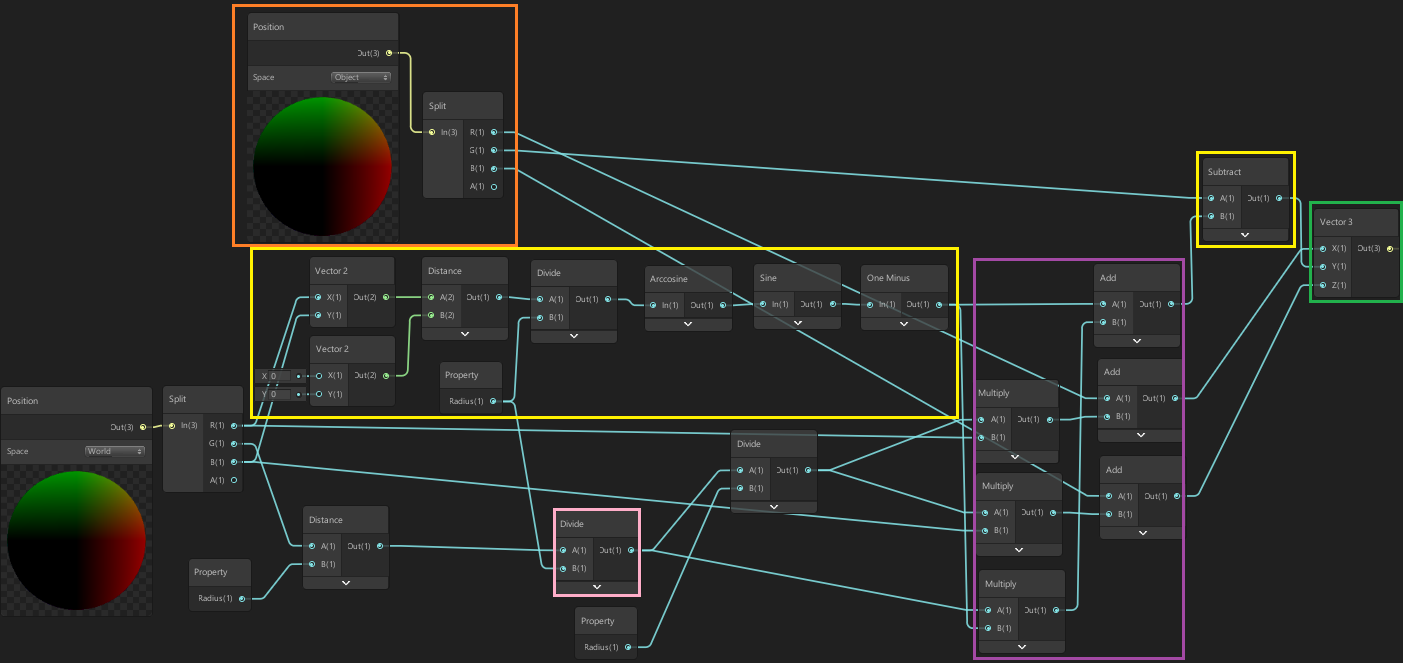
The vertexes begin in the orange box as input and end up in the green box, transformed.
Everything in the yellow boxes achieves the vertical wall effect. It pushes vertexes down based on their distance from the origin.
The modification I made to this is everything else.
The key step is the purple box. This is what actually transforms the vertexes using δ. δ is how high a wall is in terms of the radius of the sphere and is calculated in the pink box. If δ = 0.5 then the wall has a height of r/2. The awesome thing about δ is that:
- Every vertex needs to be moved on the x axis by its x coordinate times δ
- Every vertex needs to be lowered by how far down it already is times δ.
We calculate δ by finding how far above a vertex is from the radius of the circle in world space and dividing by the radius. The result is the output of the pink box. From there we can immediately use it to push the y value down by δ times the current y value.
To transform the x value (and z in 3D) we first need to transform δ to work in local space by dividing by the radius. Then we multiply the current local x position by δ and move the vertex to the left or right by that amount. The result is that all walls will be normal to the surface to the circle and we can finally use them to cast accurate shadows from any position on the circle.
Finally, here’s what it looks like to give the player a light and have them cast shadows accurate to the world.

It’s worth noting that there’s a whole lot more that needs to happen. First, we need the walls to be updated dynamically for the destructible and magic layers, so they are always accurate. Second, we need 4 copies of the walls so if the player is at a corner, every wall can cast shadows. Finally, we need the walls to move in unison to appear to be stationary when compared to the player.
To achieve the first goal, I use this tutorial for edge detection in a pixel world. When the level starts, I call the algorithm on every layer and create the lighting walls. Whenever the destructible layer is destroyed or magic is applied, I reapply the edge detection algorithm on those pixels and the ones nearby. Then I recreate the walls based on the updated info.
Achieving the second and third goal is simple because with code I can duplicate the initial walls and force them all to be relative to each other. One copy is always at the player’s position, one is always below, another is above, and the final is across from them.
The end result is perfectly accurate shadows casted by the layers of the world.